前言 RecyclerView功能强大,自推出以来受到了无数人的喜爱,它可以通过一个LayoutManager将一个RecyclerView显示为不同的样式,例如ListView、GridView样式、瀑布流样式,所以加深对于RecyclerView的学习对于开发有很重要的意义。关于RecyclerView如何使用网上有很多文章,本篇文章从源码讲解RecyclerView如何通过layoutManager来进行布局。
本文相关源码基于Android8.0,相关源码位置如下:
frameworks/support/v7/recyclerview/src/android/support/v7/widget/RecyclerView.java
frameworks/support/v7/recyclerview/src/android/support/v7/widget/LinearLayoutManager.java
RecyclerView.onLayout() Android中每一个控件从它被定义到xml布局文件到呈现在屏幕上都要经过onMeasure -> onLayout -> onDraw 三个阶段,RecyclerView同样不例外,它的布局在OnLayout函数中进行,该方法相关源码如下:
1
2
3
4
protected void onLayout (boolean changed, int l, int t, int r, int b) dispatchLayout(); mFirstLayoutComplete = true ; }
可以看到该方法只是简单的调用了dispatchLayout方法,并记录了是第一次布局,dispatchLayout()相关源码如下:
1
2
3
4
5
6
7
8
9
10
11
12
13
14
15
16
17
18
19
20
21
22
23
24
25
26
27
28
void dispatchLayout () if (mAdapter == null ) { return ; } if (mLayout == null ) { return ; } if (mState.mLayoutStep == State.STEP_START) { dispatchLayoutStep1(); mLayout.setExactMeasureSpecsFrom(this ); dispatchLayoutStep2(); }else if (mAdapterHelper.hasUpdates() || mLayout.getWidth() != getWidth() || mLayout.getHeight() != getHeight()) { mLayout.setExactMeasureSpecsFrom(this ); dispatchLayoutStep2(); } else { mLayout.setExactMeasureSpecsFrom(this ); } dispatchLayoutStep3(); }
上面源码我分3部分解释,首先注释1,没有设置RecyclerView的Adapter和LayoutManager直接return,这也解释了为什么我们平时忘记设置它们时RecyclerView会显示不出数据。
1 2 3 4 5 6 7 public static class State static final int STEP_START = 1 ; static final int STEP_LAYOUT = 1 << 1 ; static final int STEP_ANIMATIONS = 1 << 2 ; int mLayoutStep = STEP_START;
可以看到mLayoutStep默认是STEP_START取值,下面我们简单分析RecyclerView的布局过程3步分别做了什么,首先dispatchLayoutStep1()的相关源码如下:
1
2
3
4
5
6
7
8
9
10
11
12
13
14
15
16
17
18
private void dispatchLayoutStep1 () mState.assertLayoutStep(State.STEP_START); processAdapterUpdatesAndSetAnimationFlags(); if (mState.mRunSimpleAnimations) { } if (mState.mRunPredictiveAnimations){ } mState.mLayoutStep = State.STEP_LAYOUT; }
省略了很多东西,dispatchLayoutStep1()主要是来存储当前子View的状态并确定是否要执行动画、如果过有必要,会进行预言性的布局,并且保存相关信息,本文重点不在此,然后来看看dispatchLayoutStep2(),相关源码如下:
1
2
3
4
5
6
7
8
9
10
11
12
13
14
15
16
17
18
19
20
private void dispatchLayoutStep2 () startInterceptRequestLayout(); mState.assertLayoutStep(State.STEP_LAYOUT | State.STEP_ANIMATIONS); mAdapterHelper.consumeUpdatesInOnePass(); mState.mItemCount = mAdapter.getItemCount(); mState.mDeletedInvisibleItemCountSincePreviousLayout = 0 ; mState.mInPreLayout = false ; mLayout.onLayoutChildren(mRecycler, mState); mState.mRunSimpleAnimations = mState.mRunSimpleAnimations && mItemAnimator != null ; mState.mLayoutStep = State.STEP_ANIMATIONS; stopInterceptRequestLayout(false ); }
dispatchLayoutStep2()大部分源码都在此,它才是本文的重点,它在里面调用 mLayout.onLayoutChildren()将布局的具体策略交给了LayoutManager,下面我们会重点分析这个函数,最后我们再来看看dispatchLayoutStep3(),相关源码如下:
1
2
3
4
5
6
7
8
9
10
11
12
13
14
15
16
private void dispatchLayoutStep3 () mState.assertLayoutStep(State.STEP_ANIMATIONS); mState.mLayoutStep = State.STEP_START; if (mState.mRunSimpleAnimations){ } mViewInfoStore.clear() }
省略了大量代码,dispatchLayoutStep3()同样跟动画相关,它主要保存关于Views的所有信息、触发动画、做必要的清理操作,它也不是本文的重点。
1
2
3
STEP_START --> dispatchLayoutStep1() STEP_LAYOUT --> dispatchLayoutStep2() STEP_ANIMATIONS --> dispatchLayoutStep2(), dispatchLayoutStep3()
讲完3个步骤我们在回到RecyclerView.dispatchLayout(),RecyclerView的布局入口OnLayout()会执行dispatchLayout(),dispatchLayout()会根据RecyclerView的布局步骤执行dispatchLayoutStep1、2、3。那么为什么dispatchLayout()中会分2.1, 2.2, 2.3条件执行dispatchLayoutStep1、2,而不直接按顺序dispatchLayoutStep1、2、3执行布局流程?这是因为在RecyclerView的onMeasure中,dispatchLayoutStep1、2就已经有可能因为RecyclerView自动测量模式中由于测量出来的宽高不精确而被调用,相应代码如下:
1
2
3
4
5
6
7
8
9
10
11
12
13
14
15
16
17
18
19
20
21
22
23
24
25
26
27
28
29
30
protected void onMeasure (int widthSpec, int heightSpec) if (mLayout.isAutoMeasureEnabled()) { final int widthMode = MeasureSpec.getMode(widthSpec); final int heightMode = MeasureSpec.getMode(heightSpec); mLayout.onMeasure(mRecycler, mState, widthSpec, heightSpec); final boolean measureSpecModeIsExactly = widthMode == MeasureSpec.EXACTLY && heightMode == MeasureSpec.EXACTLY; if (measureSpecModeIsExactly || mAdapter == null ) { return ; } if (mState.mLayoutStep == State.STEP_START) { dispatchLayoutStep1(); } mLayout.setMeasureSpecs(widthSpec, heightSpec); mState.mIsMeasuring = true ; dispatchLayoutStep2(); mLayout.setMeasuredDimensionFromChildren(widthSpec, heightSpec); } }
RecyclerView是一个ViewGroup,如果自身的宽高设置了warp_content必须先调用dispatchLayoutStep2()布局childView后才能测量出准确宽高。所以我们再看回dispatchLayout()中的3个判断:
dispatchLayout()中2.1条件:如果mLayoutStep == State.STEP_START,证明OnMeasure中还没有进行过布局,如果mLayoutStep != State.STEP_START,证明OnMeasure中进行过布局了,直接跳到2.3条件,不用重复布局,直接使用直接使用之前数据设置RecyclerView的宽高为精确模式。
dispatchLayout()中2.2条件:2.1条件不成立时为什么直接跳到2.3条件不到2.2条件,因为上述条件基于RecyclerView正常的测量布局绘制到呈现在屏幕的过程,如果在这之后你对RecyclerView调用了notifXX函数,就会造成数据变化从而要求重新布局(requestLayout()函数调用),此时2.2条件就会成立,RecyclerView会调用dispatchLayoutStep2()重新布局。
dispatchLayout()中2.3条件:2.1条件中分析过了。
3个判断后,最终一定会调用dispatchLayoutStep3()。至此分析完RecyclerView的onLayout()。
RecyclerView.dispatchLayoutStep2() -> LayoutManager.onLayoutChildren() RecyclerView真正布局的进行就是在LayoutManager.onLayoutChildren()中进行,LayoutManager的onLayoutChildren()的实现在LayoutManager的三个子类中:LinearLayoutManager、GridLayoutManager、StaggeredGridLayoutMnager,分别对应3种不同的布局样式。这里以LinearLayoutManager中的实现为例,下面是该函数在LinearLayoutManager实现中的相关源码:
1 2 3 4 5 6 7 8 9 10 11 12 13 14 15 16 17 18 19 20 21 22 23 24 25 26 27 28 29 30 31 32 33 34 35 36 37 38 39 40 41 42 43 44 45 46 47 48 49 50 51 public void onLayoutChildren (RecyclerView.Recycler recycler, RecyclerView.State state) resolveShouldLayoutReverse(); mAnchorInfo.mLayoutFromEnd = mShouldReverseLayout ^ mStackFromEnd; updateAnchorInfoForLayout(recycler, state, mAnchorInfo); if (mAnchorInfo.mLayoutFromEnd) { }else { updateLayoutStateToFillEnd(mAnchorInfo); mLayoutState.mExtra = extraForEnd; fill(recycler, mLayoutState, state, false ); endOffset = mLayoutState.mOffset; final int lastElement = mLayoutState.mCurrentPosition; if (mLayoutState.mAvailable > 0 ) { extraForStart += mLayoutState.mAvailable; } updateLayoutStateToFillStart(mAnchorInfo); mLayoutState.mExtra = extraForStart; mLayoutState.mCurrentPosition += mLayoutState.mItemDirection; fill(recycler, mLayoutState, state, false ); startOffset = mLayoutState.mOffset; if (mLayoutState.mAvailable > 0 ) { extraForEnd = mLayoutState.mAvailable; updateLayoutStateToFillEnd(lastElement, endOffset); mLayoutState.mExtra = extraForEnd; fill(recycler, mLayoutState, state, false ); endOffset = mLayoutState.mOffset; } } }
onLayoutChildren方法有接近200行代码,但怎么也逃不出注释的2步,首先确定锚点(大部分情况下锚点就是RecyclerView上的itemView),并设置锚点的信息AnchorInfo。它定义在LinearLayoutManager中,有几个关键的属性:
1
2
3
4
5
6
7
static class AnchorInfo OrientationHelper mOrientationHelper; int mPosition; int mCoordinate; boolean mLayoutFromEnd; }
那么它是怎么确定锚点信息的?我们来看注释1 updateAnchorInfoForLayout方法的源码:
1
2
3
4
5
6
7
8
9
10
11
12
13
14
private void updateAnchorInfoForLayout (RecyclerView.Recycler recycler, RecyclerView.State state, AnchorInfo anchorInfo) if (updateAnchorFromPendingData(state, anchorInfo)) { return ; } if (updateAnchorFromChildren(recycler, state, anchorInfo)) { return ; } anchorInfo.assignCoordinateFromPadding(); anchorInfo.mPosition = mStackFromEnd ? state.getItemCount() - 1 : 0 ; }
对于里面的俩个updataAnchorFormXX函数就不展开了,对于情况1一般是我们滚动了RecyclerView的itemView或调用了RecyclerView的scrolltoXX函数,对于情况2一般是我们itemView已经加载到屏幕上了并且此时我们调用notifiXX函数来刷新或增删itemView,而情况3就是我们现在讨论的情况,RecyclerView加载到屏幕上,此时还没有布局itemView。我们点进AnchorInfo的assignCoordinateFromPadding()看看干了什么,相关源码如下:
1
2
3
4
5
6
7
8
9
10
11
void assignCoordinateFromPadding () mCoordinate = mLayoutFromEnd ? mOrientationHelper.getEndAfterPadding() : mOrientationHelper.getStartAfterPadding(); } public int getEndAfterPadding () return mLayoutManager.getHeight() - mLayoutManager.getPaddingBottom(); } public int getStartAfterPadding () return mLayoutManager.getPaddingLeft(); }
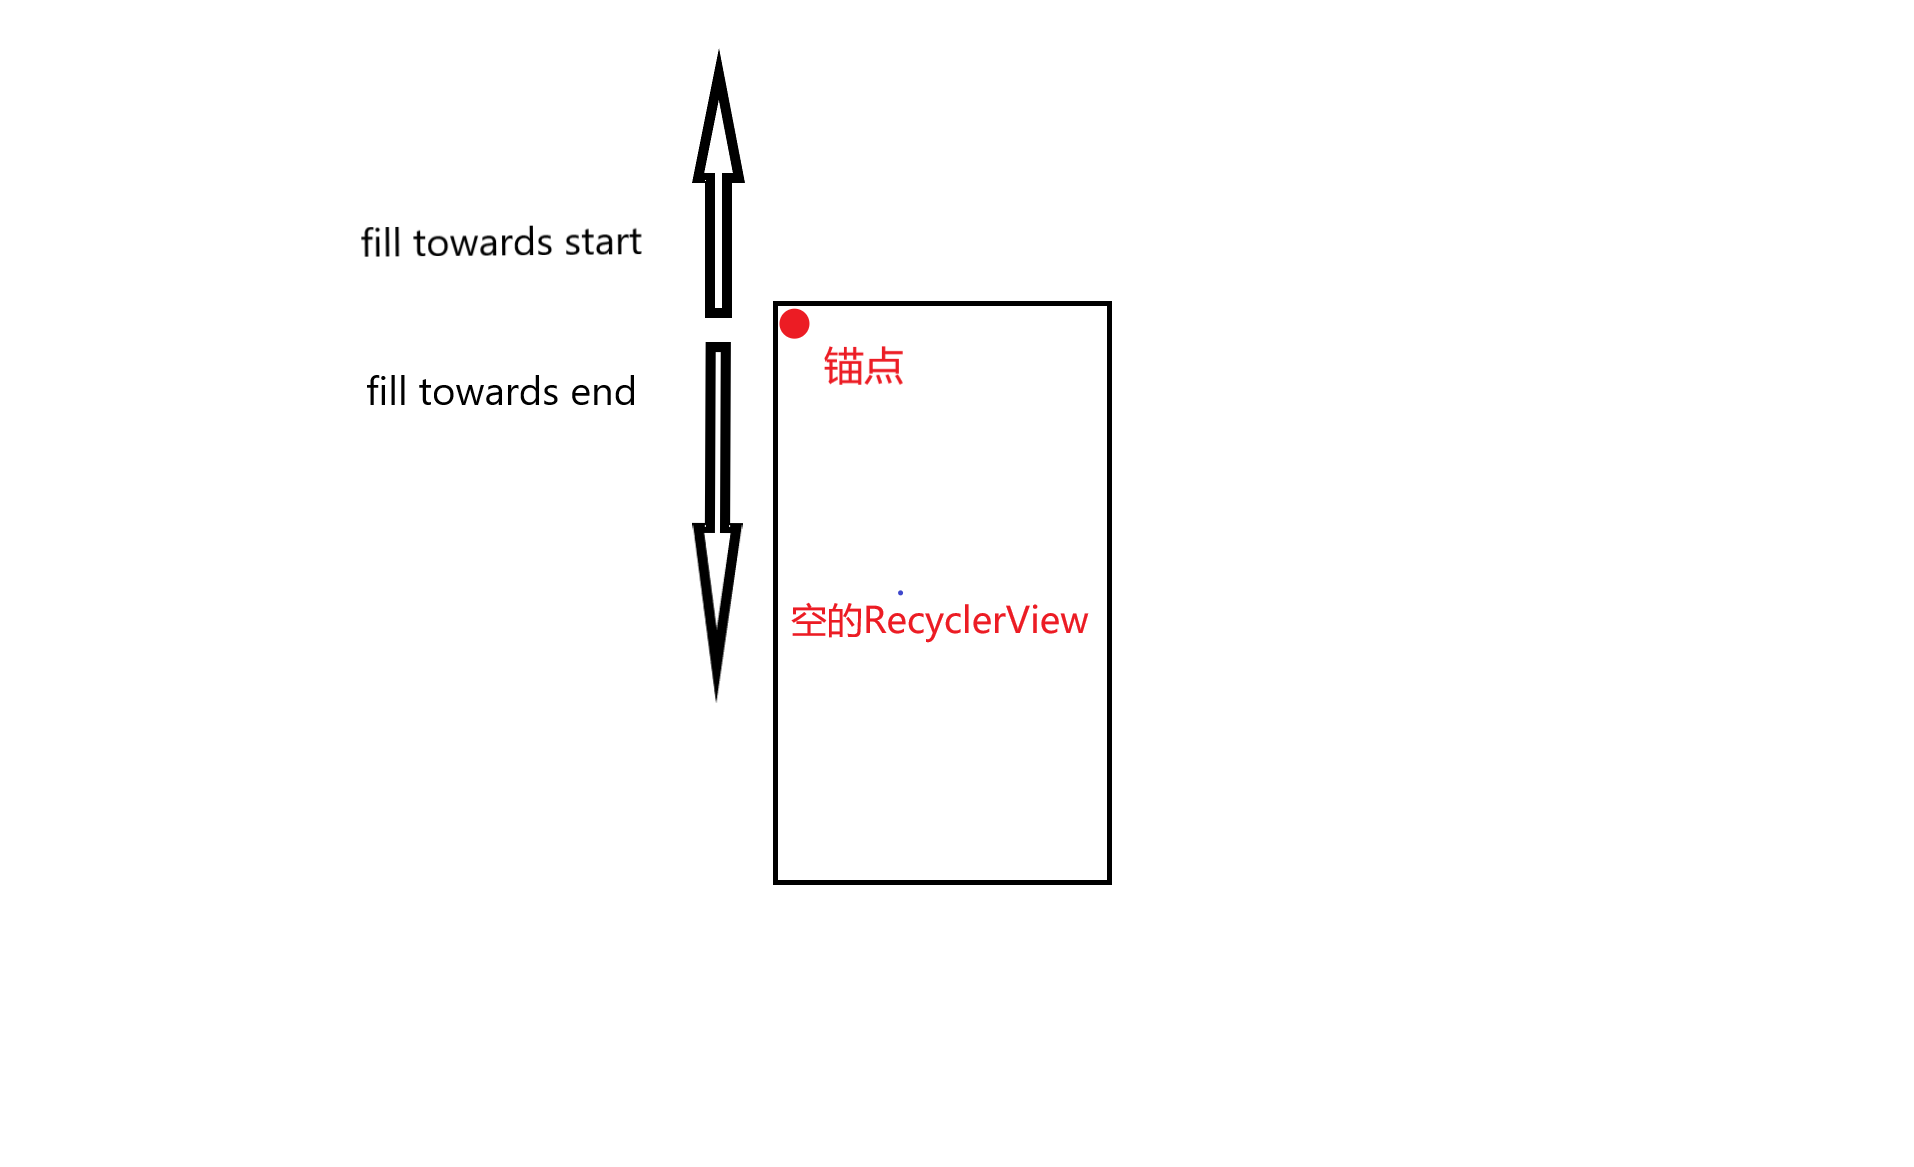
可以看到如果此时RecyclerView中没有itemView并且LinearLayoutManager的布局方向为VERTICAL和mLayoutFromEnd值为false:anchorInfo的mCoordinate就是RecyclerView的paddingLeft,anchorInfo的position就是0(锚点为RecyclerView左上角的位置)。
我们回到onlayoutChildern方法,确定了锚点后,然后就要根据AnchorInfo开始填充itemView,在开始填充之前,LinearLayoutManager会用LayoutState暂时保存一些布局信息,它定义在LinearLayoutManager中,有几个关键属性:
1
2
3
4
5
6
7
8
9
static class LayoutState int mAvailable; int mOffset; int mExtra = 0 ; int mLayoutDirection; int mCurrentPosition; int mItemDirection; }
updateLayoutStateToFillEnd函数会在向下填充前更新layoutState的值,相关源码如下:
1
2
3
4
5
6
7
8
9
10
11
12
13
14
15
16
17
18
private void updateLayoutStateToFillEnd (AnchorInfo anchorInfo) updateLayoutStateToFillEnd(anchorInfo.mPosition, anchorInfo.mCoordinate); } private void updateLayoutStateToFillEnd (int itemPosition, int offset) mLayoutState.mAvailable = mOrientationHelper.getEndAfterPadding() - offset; mLayoutState.mItemDirection = mShouldReverseLayout ? LayoutState.ITEM_DIRECTION_HEAD : LayoutState.ITEM_DIRECTION_TAIL; mLayoutState.mCurrentPosition = itemPosition; mLayoutState.mLayoutDirection = LayoutState.LAYOUT_END; mLayoutState.mOffset = offset; }
准备好layoutState后,就调用fill方法进行填充itemView,核心源码如下:
1
2
3
4
5
6
7
8
9
10
11
12
13
14
15
16
17
18
19
20
21
22
23
24
25
26
27
28
29
30
31
int fill (RecyclerView.Recycler recycler, LayoutState layoutState, RecyclerView.State state, boolean stopOnFocusable) final int start = layoutState.mAvailable; int remainingSpace = layoutState.mAvailable + layoutState.mExtra; LayoutChunkResult layoutChunkResult = mLayoutChunkResult; while ((layoutState.mInfinite || remainingSpace > 0 ) && layoutState.hasMore(state)) { layoutChunkResult.resetInternal(); layoutChunk(recycler, state, layoutState, layoutChunkResult); if (layoutChunkResult.mFinished) { break ; } layoutState.mOffset += layoutChunkResult.mConsumed * layoutState.mLayoutDirection; if (!layoutChunkResult.mIgnoreConsumed || mLayoutState.mScrapList != null || !state.isPreLayout()) { layoutState.mAvailable -= layoutChunkResult.mConsumed; remainingSpace -= layoutChunkResult.mConsumed; } } return start - layoutState.mAvailable; }
上面的注释很详细,大概流程就是在while循环中根据剩余可用空间不断的调用layoutChunk()函数进行布局itemView,layoutChunk方法会在里面根据RecyclerView的缓存机制获取一个View从而把它填充到RecyclerView中去,下面继续来看layoutChunk方法相关源码:
1
2
3
4
5
6
7
8
9
10
11
12
13
14
15
16
17
18
19
20
21
22
23
24
25
26
27
28
29
30
31
32
33
34
35
36
37
38
39
40
41
void layoutChunk (RecyclerView.Recycler recycler, RecyclerView.State state, LayoutState layoutState, LayoutChunkResult result) View view = layoutState.next(recycler); if (view == null ) { result.mFinished = true ; return ; } RecyclerView.LayoutParams params = (RecyclerView.LayoutParams) view.getLayoutParams(); measureChildWithMargins(view, 0 , 0 ); result.mConsumed = mOrientationHelper.getDecoratedMeasurement(view); int left, top, right, bottom; if (mOrientation == VERTICAL) { if (isLayoutRTL()) { right = getWidth() - getPaddingRight(); left = right - mOrientationHelper.getDecoratedMeasurementInOther(view); } else { left = getPaddingLeft(); right = left + mOrientationHelper.getDecoratedMeasurementInOther(view); } if (layoutState.mLayoutDirection == LayoutState.LAYOUT_START) { bottom = layoutState.mOffset; top = layoutState.mOffset - result.mConsumed; } else { top = layoutState.mOffset; bottom = layoutState.mOffset + result.mConsumed; } } else { } layoutDecoratedWithMargins(view, left, top, right, bottom); if (params.isItemRemoved() || params.isItemChanged()) { result.mIgnoreConsumed = true ; } }
在layoutChunk方法中首先从layoutState中根据mCurrentPosition获取itemView,然后获取itemView的布局参数,并且根据布局方式(横向或纵向)计算出itemView的上下左右布局,最后调用layoutDecoratedWithMargins方法实现布局itemView,layoutDecoratedWithMargins方法定义在LayoutManger中,具体代码如下:
1
2
3
4
5
6
7
public void layoutDecoratedWithMargins (@NonNull View child, int left, int top, int right, int bottom) final LayoutParams lp = (LayoutParams) child.getLayoutParams(); final Rect insets = lp.mDecorInsets; child.layout(left + insets.left + lp.leftMargin, top + insets.top + lp.topMargin, right - insets.right - lp.rightMargin, bottom - insets.bottom - lp.bottomMargin); }
可以看到,只是调用了itemView的layout函数将itemView布局到具体的位置。
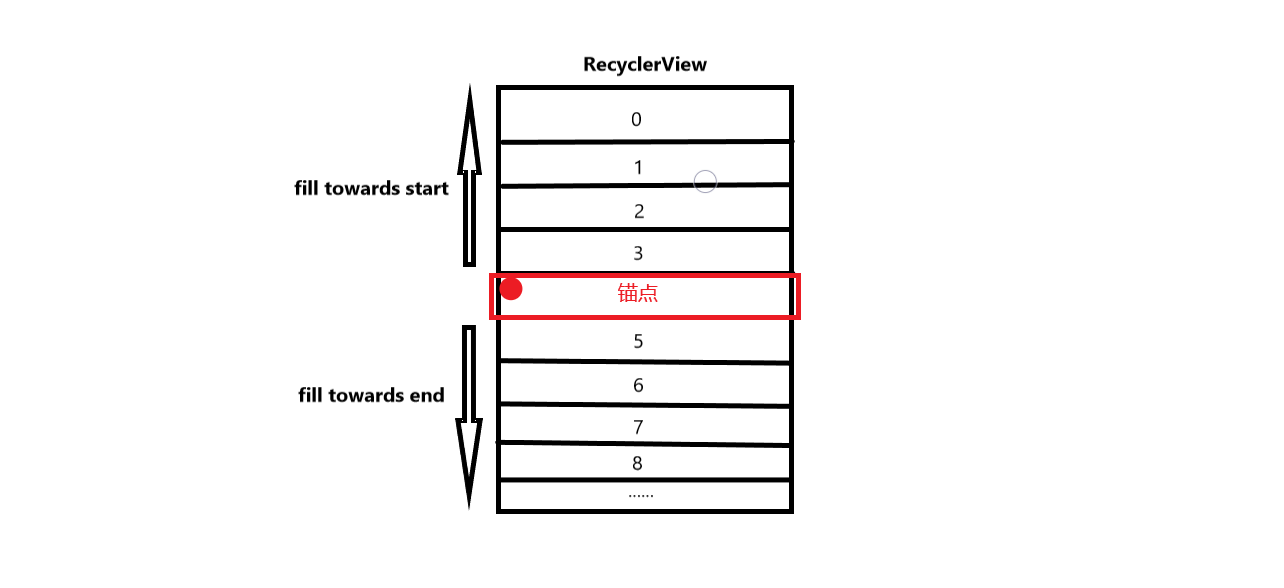
我们再回到onlayoutChildern方法,按照上面图一,我们已经填充了下面,但是上面是不用填充的,因为没有可用空间,所以注释2.2基本下是不会走的了。而fill towaards Start步骤和fill towards End差不多。那么为什么RecyclerView进行两次填充呢?因为RecyclerView理想的锚点如下图:
上面是RecyclerView的方向为VERTICAL的情况,当为HORIZONTAL方向的时候填充算法是不变的。但我们一般是图一的情况,从上往下填充。
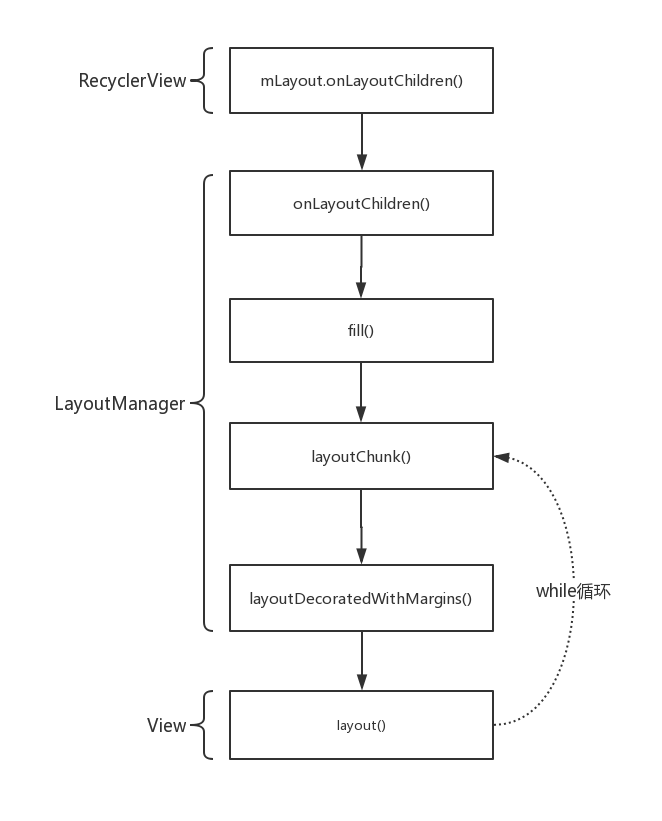
总结 一图胜千言,下图是LayoutManager循环布局所有的itemView。
可以看到RecyclerView将布局的职责分离到LayoutManager中,使得RecyclerView更加灵活,我们也可以自定义自己的LayoutManger,实现自己想要的布局。可以看到RecyclerView具有很强大的扩展性,所以深入学习这个控件是很有必要的。能看到这里的都是有毅力的人,本文只是RecyclerView学习的第一篇,以后会继续分析RecyclerView的缓存设计。
参考资料:
《Android源码设计与分析》
RecyclerView和ListView原理
RecyclerView源码分析(三)–布局流程


