前言
上面3个名词在开发中经常听到,在Android开发中,Window是所有视图的载体,如Activity,Dialog和Toast的视图,我们想要对Window进行添加和删除就要通过WindowManager来操作,而WindowManager就是通过Binder与WindowManagerService进行跨进程通信,把具体的实现工作交给WindowManagerService(下面简称WMS)。下面分别介绍它们,理清它们的基本脉络。
本文基于Android8.0, 相关源码位置如下:
frameworks/base/core/java/android/view/*.java(*代表Window, WindowManager, ViewManager, WindowManagerImpl,WindowManagerGlobal, ViewRootImpl)
frameworks/base/core/java/com/android/internal/policy/PhoneWindow.java
frameworks/base/services/core/java/com/android/server/wm/WindowManagerService.java
frameworks/base/services/core/java/com/android/server/wm/Session.java
Window
1、Window是什么
Window在Android开发中是一个窗口的概念,它是一个抽象类,我们打开Window,如下:
1 | public abstract class Window { |
可以看到里面有我们熟悉的一些字段和方法,以Activity对应的Window为例,具体的实现类是PhoneWindow,在PhoneWindow中有一个顶级View—DecorView,继承自FrameLayout,我们可以通过getDecorView()获得它,当我们调用Activity的setContentView时,其实最终会调用Window的setContentView,当我们调用Activity的findViewById时,其实最终调用的是Window的findViewById,这也间接的说明了Window是View的直接管理者。但是Window并不是真实存在的,它更多的表示一种抽象的功能集合,View才是Android中的视图呈现形式,绘制到屏幕上的是View不是Window,但是View不能单独存在,它必需依附在Window这个抽象的概念上面,Android中需要依赖Window提供视图的有Activity,Dialog,Toast,PopupWindow,StatusBarWindow(系统状态栏),输入法窗口等,因此Activity,Dialog等视图都对应着一个Window。
2、Window的类型(应用窗口,子窗口,系统窗口)与层级
Window的类型type被定义在WindowManager中的静态内部类LayoutParams中,如下:
1 | public interface WindowManager extends ViewManager { |
LayoutParams中以TYPE开头的值有很多,但总体可以分为3类:
- 应用程序窗口:type值范围是1~99,Activity就是一个典型的应用程序窗口,type值是TYPE_BASE_APPLICATION,WindowManager的LayoutParams默认type值是TYPE_APPLICATION。
- 子窗口:type值范围是1000~1999,PupupWindow就是一个典型的子窗口,type值是TYPE_APPLICATION_PANEL,子窗口不能独立存在,必须依附于父窗口
- 系统窗口:type值范围是2000~2999,系统窗口的类型很多,上面并没有全部列举出来,系统状态栏就是一个典型的系统窗口,type值是TYPE_STATUS_BAR,与应用程序窗口不同的是,系统窗口的创建是需要声明权限的。
type值决定了决定了Window显示的层级(z-ordered),即在屏幕Z轴方向的显示次序,一般情况下type值越大,则窗口显示的越靠前,在Window的3种类型中,应用程序窗口的层级范围是199,子窗口的层级范围是10001999,系统窗口的层级范围是2000~2999,层级范围对应着type值,如果想要Window位于所有的Window上,采用较大的层级即可,例如系统层级。
3、Window的属性
Window的类型flag同样被定义在WindowManager中的静态内部类LayoutParams中,如下:
1 | public interface WindowManager extends ViewManager { |
LayoutParams中定义的flag属性同样很多,这里挑几个常见的讲解:
- FLAG_ALLOW_LOCK_WHILE_SCREEN_ON:只要窗口对用户可见,就允许在屏幕开启状态下锁屏。
- FLAG_KEEP_SCREEN_ON: 只要窗口对用户可见,屏幕就一直亮着。
- FLAG_SHOW_WHEN_LOCKED:窗口可以在锁屏的界面上显示。
- FLAG_NOT_FOCUSABLE:窗口不能获取焦点,也不能接受任何输入事件,此标志同时会启用FLAG_NOT_TOUCH_MODAL,最终事件会直接传递给下层的具有焦点的窗口。
- FLAG_NOT_TOUCH_MODAL:当前窗口区域以外的触摸事件会传递给底层的窗口,当前窗口区域内的触摸事件则自己处理,一般来说都要开启此标记,否则其他Window将无法收到单机事件。
- FLAG_NOT_TOUCHABLE:窗口不接收任何触摸事件
可以看到LayoutParams中的type和flag非常重要,可以控制Window的显示特性。知道了Window的相关信息,就能更好的了解WindowManager。
WindowManager
WindowManager是一个接口,里面常用的方法有:添加View,更新View和删除View,WindowManager继承自ViewManager,这三个方法定义在ViewManager中,如下:
1 | public interface ViewManager |
可以看到这些方法传入的参数是View,不是Window,说明WindowManager管理的是Window中的View,我们通过WindowManager操作Window就是在操作Window中的View。WindowManager的具体实现类是WindowManagerImp,我们看一下相应方法的实现,如下:
1 | public final class WindowManagerImpl implements WindowManager { |
可以看到WindowManagerImp也没有做什么,它把3个方法的操作都委托给了WindowManagerGlobal这个单例类,我们还看到了mParentWindow这个字段,它是Window类型,是从构造中被传入,所以WindowManager会持有Window的引用,这样WindowManager就可以对Window做操作了。比如mGlobal.addView,我们可以理解为往window中添加View,在WindowManagerGlobal中,如下:
1 | public void addView(View view, ViewGroup.LayoutParams params,Display display, Window parentWindow){ |
最终会走到ViewRootlmp的setView中, 如下:
1 | public void setView(View view, WindowManager.LayoutParams attrs, View panelParentView) { |
在ViewRootlmp的setView中,首先通过requestLayout()发起View绘制流程,然后在mWindowSession的addToDisplay中通过Binder与WMS进行跨进程通信,请求显示窗口上的视图,至此View就会显示到屏幕上。这个mWindowSession是一个IWindowSession.AIDL接口类型,用来实现跨进程通信,在WMS内部会为每一个应用的请求保留一个单独的Session,同样实现了IWindowSession接口,应用与WMS之间的通信就通过这个Session。那么这个mWindowSession什么时候被赋值的呢?就在上面的注释1中,我们打开ViewRootlmp的构造函数,如下:
1 | public ViewRootImpl(Context context, Display display) { |
可以看到mWindowSession是通过WindowManagerGlobal的单例类的getWindowSession()获得的,我们打开WindowManagerGlobal的getWindowSession(),如下:
1 | public static IWindowSession getWindowSession() { |
我们首先看1,getWindowManagerService()源码如下:
1 | public static IWindowManager getWindowManagerService() { |
可以看到, ServiceManager.getService(“window”)就是获得WMS,然后通过IWindowManager.Stub.asInterface()转换成WMS在应用进程的本地代理,getWindowManagerService()就是返回WMS在本地应用进程的代理。(这里涉及到Binder知识)
然后看2,通过WMS的本地代理的openSession来获取Session,我们可以在WMS中找到这个函数实现,如下:
1 |
|
至此建立起与WMS的通信的桥梁。然后WindowManager就间接的通过Session向WMS发起显示窗口视图的请求,WMS会向应用返回和窗口交互的信息。至于mGlobal.updateViewLayout和mClobal.removeView也是类似的过程,可自行研究。
WindowManagerService
WindowManagerService是一个系统级服务,由SystemService启动,实现了IWindowManager.AIDL接口,它的主要功能分为以下俩方面:
1、窗口管理
它负责窗口的启动,添加和删除,它还负责窗口的层级显示(z-orderes)和维护窗口的状态。我们继续上面的mGlobal.addView,上面讲到这个方法是向WMS发起一个显示窗口视图的请求,最终会走到mWindowSession.addToDisplay()方法,我们可以在Session中找到这个函数实现,如下:
1 |
|
可以看到addToDisplay方法中最终返回了WMS中addWindow所返回的结果,Window的添加请求就交给WMS去处理,addWindow的实现在WMS中,里面代码很长,这里就不再深究了(留在下一篇文章从一个例子分析),addWindow主要做的事情是先进行窗口的权限检查,因为系统窗口需要声明权限,然后根据相关的Display信息以及窗口信息对窗口进行校对,再然后获取对应的WindowToken,再根据不同的窗口类型检查窗口的有效性,如果上面一系列步骤都通过了,就会为该窗口创建一个WindowState对象,以维护窗口的状态和根据适当的时机调整窗口状态,最后就会通过WindowState的attach方法与SurfaceFlinger通信。因此SurfaceFlinger能使用这些Window信息来合成surfaces,并渲染输出到显示设备。
2、输入事件的中转站
当我们的触摸屏幕时就会产生输入事件,在Android中负责管理事件的输入是InputManagerService,在启动IMS的时候会在native层创建NativeInputManager,在NativeInputManager的构造中会创建InputManager和Eventhub(监听/dev/input/设备节点中所有事件的输入),在InputManager构造中会依此创建InputDispatcher、InputReader、InputReaderThread、InputDispatcherThread。
InputReader运行在InputReaderThread中,它会不断循环从EventHub中读取原始输入事件,InputReader将这些原始输入事件加工后就交给运行在InputDispatcherThread中的InputDispatcher,而InputDispatcher它会寻找一个最合适的窗口来处理输入事件,WMS是窗口的管理者,WMS会把所有窗口的信息更新到InputDispatcher中,这样InputDispatcher就可以将输入事件派发给合适的Window,Window就会把这个输入事件传给顶级View,然后就会涉及我们熟悉的事件分发机制。
我们来再来看在ViewRootImp的setView中调用mWindowSession.addToDisplay方法时传入的参数:
1 | public void setView(View view, WindowManager.LayoutParams attrs, View panelParentView) { |
注意这个传入的mInputChannel参数,它是InputChannel类型,它实现了Parcelable接口,用于接受WMS返回来的输入事件,在WMS中会创建两个InputChannel实例,一个会通过mInputChannel参数传回来,一个会放在WMS的WindowState中,WindowState中的InputChannel会交给InputDispatcher,这样应用端和InputDispatcher端就可以通过这两个InputChannel来进行事件的接收和发送。
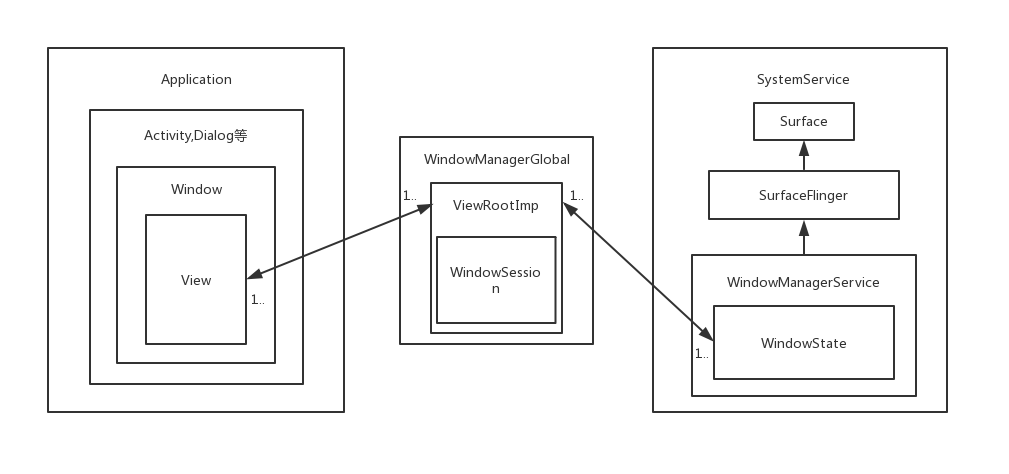
它们之间的类图关系如下:

总结
通过上面简单的介绍,我们知道Window是View的载体,我们想要对Window进行删除,添加,更新View就得通过WindowManager,WindowManager与WMS通过Session进行通信,具体的实现就交给了WMS处理,WMS会为每一个Window创建一个WindowState并管理它们,具体的渲染工作WMS就交给SurfaceFinger处理。本文所讨论的WMS系统相关结构如下:

参考资料:
《Anddroid开发艺术探索》
《Android源码设计模式》
