前言
从上一篇文章中,我们了解到了Window的体系机制,也知道了window分为三种类型,分别是应用窗口(Application Window)、子窗口(Sub Window)、系统窗口(System Window),本文通过源码以Activity为例讲解一下应用窗口的添加过程,如果没看过上一篇文章建议先看,对于不同类型的窗口的添加,它们在WindowManager中的处理过程会有一点不一样,但是对于在WMS的处理过程中,基本上都是一样的。所以本文深入讲解一下Activity窗口的添加过程,知道了这个过程,对于其他类型的窗口添加也就能举一反三了。
本文基于Android8.0, 相关源码位置如下:
frameworks/base/core/java/android/view/*.java(*代表Window, WindowManager,         WindowManagerImpl,WindowManagerGlobal, ViewRootImpl)
frameworks/base/core/java/android/app/*.java(*代表Activity,ActivityThread)            frameworks/base/core/java/com/android/internal/policy/PhoneWindow.java    frameworks/base/services/core/java/com/android/server/wm/WindowManagerService.java
frameworks/base/services/core/java/com/android/server/wm/Session.java
Activity的Window创建 - Activity :: attach() 熟悉Activity启动流程 的都知道Window的创建过程是在activity的attach方法中,它在调用Activity的onCreate方法前完成一些重要数据的初始化,如下:
1 2 3 4 5 6 7 8 9 10 11 12 13 14 15 16 17 18 19 20 21 22 23 24 25 26 27 28 29 30 31 32 33 final void attach (Context context, ActivityThread aThread, Instrumentation instr, IBinder token, int ident, Application application, Intent intent, ActivityInfo info, CharSequence title, Activity parent, String id, NonConfigurationInstances lastNonConfigurationInstances, Configuration config, String referrer, IVoiceInteractor voiceInteractor, Window window, ActivityConfigCallback activityConfigCallback) mWindow = new PhoneWindow(this , window, activityConfigCallback); mWindow.setWindowControllerCallback(this ); mWindow.setCallback(this ); mWindow.setOnWindowDismissedCallback(this ); mWindow.getLayoutInflater().setPrivateFactory(this ); if (info.softInputMode != WindowManager.LayoutParams.SOFT_INPUT_STATE_UNSPECIFIED) { mWindow.setSoftInputMode(info.softInputMode); } if (info.uiOptions != 0 ) { mWindow.setUiOptions(info.uiOptions); } mWindow.setWindowManager( (WindowManager)context.getSystemService(Context.WINDOW_SERVICE), mToken, mComponent.flattenToString(), (info.flags & ActivityInfo.FLAG_HARDWARE_ACCELERATED) != 0 ); mWindowManager = mWindow.getWindowManager(); }
在attach里。跟Window无关的我都省略掉了,我们看到attach方法里,在注释1中,首先new 了一个PhoneWindow赋值mWinow,mWindow是Window类型,它是一个抽象类,所以从这里可以看出Activity的Window的具体实现类是PhoneWindow,接下来,给mWindow设置回调,传入的参数是this,说明Activity实现了这些回调接口,这样当Window接收到外界的状态变化或输入事件时就会回调Activity的方法,其中我们比较熟悉的接口回调是Window的Callback接口,它里面有我们熟悉的回调方法如:dispatchTouchEvent()、onWindowFocusChanged()、onAttachedToWindow()和onDetachedFromWindow()。
接着我们来看注释2,这里通过Window的setWindowManager方法把WanagerManger与Window进行关联,然后通过Window的getWindowManager()把WanagerManger与Activity进行关联。
Window与WanagerManager的关联 - Window :: setWindowManager() 我们知道Window的添加、更新和删除都是要通过WanagerManager的,接下来我们看看Window与WanagerManager是如何关联的,从上面知道该过程是在Window的setWindowManager方法中,如下:
1 2 3 4 5 6 7 8 9 10 11 12 13 14 15 16 public void setWindowManager (WindowManager wm, IBinder appToken, String appName, boolean hardwareAccelerated) mAppToken = appToken; mAppName = appName; mHardwareAccelerated = hardwareAccelerated || SystemProperties.getBoolean(PROPERTY_HARDWARE_UI, false ); if (wm == null ) { wm = (WindowManager)mContext.getSystemService(Context.WINDOW_SERVICE); } mWindowManager = ((WindowManagerImpl)wm).createLocalWindowManager(this ); }
在setWindowManager方法中,是有关window的一些属性的赋值,其中mAppToken是Activity中的token,它在Activity启动的过程中从AMS中传递过来的,这里你只要记住Activity应用窗口的token值是Activity中的token值,接下来如果wm为空就获取WMS并转成WindowManager赋值给wm,wm是WindowManager,它是一个接口,它的具体实现类是WindowManagerImpl,所以接下来的注释1中wm转成WindowManagerImpl,并调用WindowManagerImpl的createLocalWindowManager方法,我们来看看WindowManagerImpl的createLocalWindowManager方法,如下:
1 2 3 4 5 6 7 8 9 public WindowManagerImpl createLocalWindowManager (Window parentWindow) return new WindowManagerImpl(mContext, parentWindow); } private WindowManagerImpl (Context context, Window parentWindow) mContext = context; mParentWindow = parentWindow; }
这个方法很简单,只是简单的返回一个WindowManagerImpl对象,注意它传入了一个parentWindow参数,它是Window类型,说明此时构建的WindowManagerImpl是与具体的Window关联的,至此,在java层上Window就已经与WindowManager建立起联系。
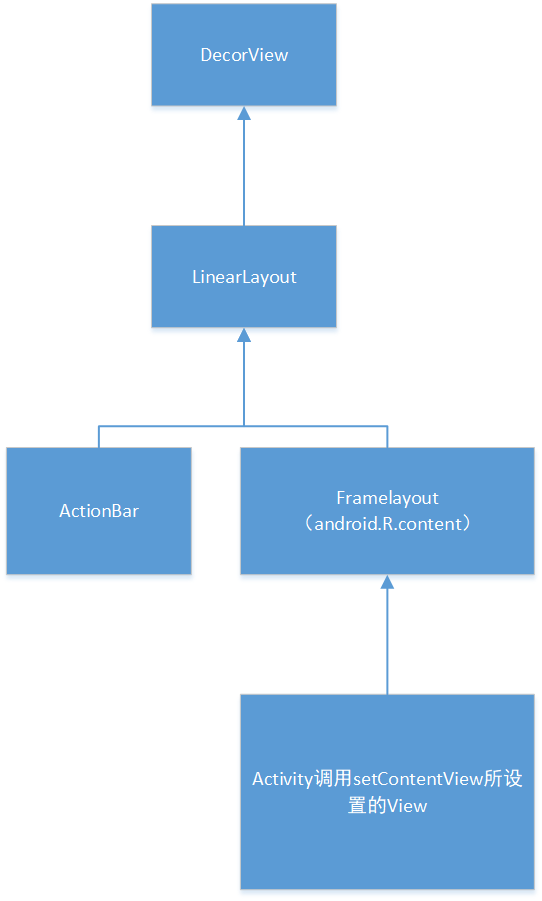
Activity的Window的视图创建 - Window :: setContentView() 从上一篇文章我们知道,View是依附在Window上的,在Activity的启动过程中的attach方法里已经完成了Activity的Window的创建和与WindowManager的关联,那么Activity的视图即View是在哪里创建的呢?答案是在我们熟悉的setContentView方法中,我们先来看一张图:
如图所示每一个Activity都有一个顶级View叫做DecorView,一般情况下它会包含一个竖直方向的LinearLayout,在这个LinearLayout中包含两部分(具体情况与Android的版本与主题有关),上面是标题栏,下面是内容布局,内容布局其实是一个FrameLayout,我们平时setContentView指定的布局其实是set到了这个FrameLayout中,所以这个方法叫setContentView也是也是很贴和实际的,因为FrameLayout的id就是android.R.id.content,理解了这些知识后,我们来看Activity中的setContentView方法,如下:
1 2 3 4 5 6 7 public void setContentView (@LayoutRes int layoutResID) getWindow().setContentView(layoutResID); initWindowDecorActionBar(); }
我们看注释1,前面已经讲过Activity的Window的创建,所以这里的getWindow其实返回的是Window,而Window的实现类是PhoneWindow,所以这里调用的是PhoneWindow的setContentView,并传入了我们的内容布局id,PhoneWindow的setContentView方法的相应源码如下:
1 2 3 4 5 6 7 8 9 10 11 12 13 14 15 16 17 18 19 20 21 22 23 24 25 26 27 28 @Override public void setContentView (int layoutResID) if (mContentParent == null ) { installDecor(); } else if (!hasFeature(FEATURE_CONTENT_TRANSITIONS)) { mContentParent.removeAllViews(); } if (hasFeature(FEATURE_CONTENT_TRANSITIONS)) { final Scene newScene = Scene.getSceneForLayout(mContentParent, layoutResID, getContext()); transitionTo(newScene); } else { mLayoutInflater.inflate(layoutResID, mContentParent); } mContentParent.requestApplyInsets(); final Callback cb = getCallback(); if (cb != null && !isDestroyed()) { cb.onContentChanged(); } mContentParentExplicitlySet = true ; }
从注释中可以看出这个方法如果忽略转场动画的处理的话,可以分为两部分,第一部分是注释1.1的DecorView的创建和加载mContentParent,第二部分是注释2.2的把我们的layoutResID的布局加载进mContentParent,其中重点是第一部分,下面我们来分析PhoneWindow的setContentView方法的第一部分。
1、PhoneWindow :: installDecor() 我们来看PhoneWindow的installDecor方法,如下:
1 2 3 4 5 6 7 8 9 10 11 12 13 14 15 16 17 18 private void installDecor () if (mDecor == null ) { mDecor = generateDecor(-1 ); } else { mDecor.setWindow(this ); } if (mContentParent == null ) { mContentParent = generateLayout(mDecor); } }
installDecor()有一百多行代码,但是重点就是上面几句,因为这里我们是第一次创建mDecor,所以mDecor就为空,那么上面就分为两部分,第一部分是注释1.1的创建mDecor,第二部分是注释2的加载加载mContentParent,我们先看installDecor方法的第一部分。
1.1 PhoneWindow :: generateDecor() PhoneWindow的generateDecor()方法如下:
1 2 3 4 5 6 7 8 9 10 11 12 protected DecorView generateDecor (int featureId) Context context; if (mUseDecorContext) { Context applicationContext = getContext().getApplicationContext(); } else { context = getContext(); } return new DecorView(context, featureId, this , getAttributes()); }
可以看到generateDecor就是简单的创建了一个DecorView并返回,其中this是Window实例,DecorView的构造方法中会把Window设置给DecorView中的mWindow。我们看一下DecorView是什么,如下:
1 2 3 4 public class DecorView extends FrameLayout implements RootViewSurfaceTaker , WindowCallbacks }
可以看到DecorView就是一个FrameLayout。
我们回到installDecor方法中,接下来我们来看installDecor方法的第二部分。
1.2 PhoneWindow :: generateLayout(mDecor) PhoneWindow的generateLayout()方法如下:
1 2 3 4 5 6 7 8 9 10 11 12 13 14 15 16 17 18 19 20 21 22 23 24 25 26 27 28 29 30 31 32 33 34 35 36 37 38 39 40 41 42 43 44 45 46 47 48 49 50 51 52 53 54 55 56 57 58 59 60 61 62 63 64 65 66 protected ViewGroup generateLayout (DecorView decor) TypedArray a = getWindowStyle(); int layoutResource; int features = getLocalFeatures(); if ((features & (1 << FEATURE_SWIPE_TO_DISMISS)) != 0 ) { layoutResource = R.layout.screen_swipe_dismiss; setCloseOnSwipeEnabled(true ); } else if ((features & ((1 << FEATURE_LEFT_ICON) | (1 << FEATURE_RIGHT_ICON))) != 0 ) { if (mIsFloating) { TypedValue res = new TypedValue(); getContext().getTheme().resolveAttribute( R.attr.dialogTitleIconsDecorLayout, res, true ); layoutResource = res.resourceId; } else { layoutResource = R.layout.screen_title_icons; } removeFeature(FEATURE_ACTION_BAR); } else if ((features & ((1 << FEATURE_PROGRESS) | (1 << FEATURE_INDETERMINATE_PROGRESS))) != 0 && (features & (1 << FEATURE_ACTION_BAR)) == 0 ) { layoutResource = R.layout.screen_progress; } else if ((features & (1 << FEATURE_CUSTOM_TITLE)) != 0 ) { if (mIsFloating) { TypedValue res = new TypedValue(); getContext().getTheme().resolveAttribute( R.attr.dialogCustomTitleDecorLayout, res, true ); layoutResource = res.resourceId; } else { layoutResource = R.layout.screen_custom_title; } removeFeature(FEATURE_ACTION_BAR); } else if ((features & (1 << FEATURE_NO_TITLE)) == 0 ) { if (mIsFloating) { TypedValue res = new TypedValue(); getContext().getTheme().resolveAttribute( R.attr.dialogTitleDecorLayout, res, true ); layoutResource = res.resourceId; } else if ((features & (1 << FEATURE_ACTION_BAR)) != 0 ) { layoutResource = a.getResourceId( R.styleable.Window_windowActionBarFullscreenDecorLayout, R.layout.screen_action_bar); } else { layoutResource = R.layout.screen_title; } } else if ((features & (1 << FEATURE_ACTION_MODE_OVERLAY)) != 0 ) { layoutResource = R.layout.screen_simple_overlay_action_mode; } else { layoutResource = R.layout.screen_simple; } mDecor.startChanging(); mDecor.onResourcesLoaded(mLayoutInflater, layoutResource); ViewGroup contentParent = (ViewGroup)findViewById(ID_ANDROID_CONTENT); mDecor.finishChanging(); return contentParent; }
generateLayout()这个方法非常长,但是它里面的逻辑很简单,这个方法的主要作用是根据当前的Activity的theme的属性设置Activity的Window,并把根据features获取到的布局加载进传进来的DecorView,并从DecorView中获取android.R.id.content的布局返回给mContentParent,我们只要看懂注释1~3 就清楚了。
首先我们看注释1,因为if…else…的语句非常多,所以我就选了最后一个else语句的layoutResource对应的布局文件讲解,它的位置在:/frameworks/base/core/res/res/layout/screen_simple.xml ,如下:
1 2 3 4 5 6 7 8 9 10 11 12 13 14 15 16 17 18 19 20 21 22 <LinearLayout xmlns:android ="http://schemas.android.com/apk/res/android" android:layout_width ="match_parent" android:layout_height ="match_parent" android:fitsSystemWindows ="true" android:orientation ="vertical" > <ViewStub android:id ="@+id/action_mode_bar_stub" android:inflatedId ="@+id/action_mode_bar" android:layout ="@layout/action_mode_bar" android:layout_width ="match_parent" android:layout_height ="wrap_content" android:theme ="?attr/actionBarTheme" /> <FrameLayout android:id ="@android:id/content" android:layout_width ="match_parent" android:layout_height ="match_parent" android:foregroundInsidePadding ="false" android:foregroundGravity ="fill_horizontal|top" android:foreground ="?android:attr/windowContentOverlay" /> </LinearLayout >
screen_simple.xml文件就是一个布局文件,大家把这个布局对应一下上面得那张图,就会有一种恍然大悟得感觉了,所以我们紧接着来看注释2,它就是把上面这个screen_simple.xml布局文件加载进DecorView中。
我们再看注释3,ID_ANDROID_CONTENT就是android.R.id.content的常量,看一下findViewById方法的源码,如下:
1 2 3 4 5 6 @Nullable public <T extends View> T findViewById (@IdRes int id) { return getDecorView().findViewById(id); }
可以看到findViewById方法中获取到DecorView,然后调用DecorView的findViewById方法,因为在注释2中我们已经把layoutResource对应的布局加载进DecorView中了,所以这时就获取到android.R.id.content的布局。在generateLayout方法的最后,把android.R.id.content的布局返回给mContentParent。
我们再回到installDecor方法中,至此我们已经创建好DecorView ,也通过DecorView获取到mContentParent, 即android.R.id.content的布局 。
我们来分析PhoneWindow的setContentView方法的第二部分。
2、mLayoutInflater.inflate(layoutResID, mContentParent) layoutResID就是我们setContentView传进来的内容布局id,所以这里就把内容布局加载进mContentParent中了。至此Window的setContentView分析完毕。
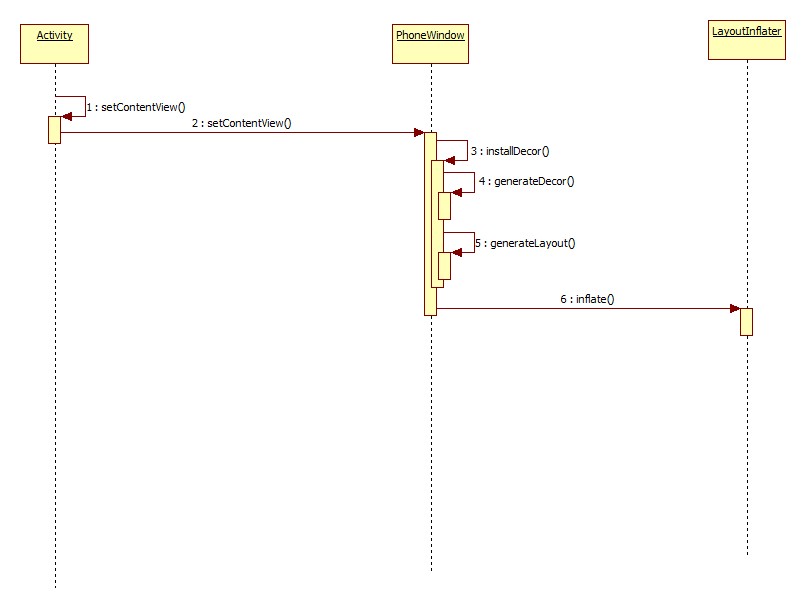
这个过程如下图:
我们回到Activity的setContentView方法,其实到这里Activity的视图,也可以是说Activity的Window的视图DecorView就创建好了,接下来就是把这个DecorView显示到屏幕上。
Activity的Window的视图添加 - WindowManager :: addView() 熟悉Activity的启动流程的都知道,Activity会在handleResumeActivity方法中把DecorView显示出来,而添加一个Winow是通过WindowManager的addView方法实现的,但是Window只是View的载体,并不是真实存在的,所以addView其实就是添加一个View,这个View是依附在Window上,并且这个View是 View Hierarchy 最顶端的根 View,而Activity的的顶级View是DecorView, 所以添加Activity的Window就是添加DecorView。我们来看一下handleResumeActivity方法,如下:
1 2 3 4 5 6 7 8 9 10 11 12 13 14 15 16 17 18 19 20 21 22 23 24 25 26 27 28 29 30 31 32 33 34 35 36 37 38 39 40 41 42 43 44 45 46 47 48 49 50 51 52 53 54 55 56 57 58 59 60 61 final void handleResumeActivity (IBinder token, boolean clearHide, boolean isForward, boolean reallyResume, int seq, String reason) ActivityClientRecord r = mActivities.get(token); r = performResumeActivity(token, clearHide, reason); if (r != null ) { final Activity a = r.activity; if (r.window == null && !a.mFinished && willBeVisible) { r.window = r.activity.getWindow(); View decor = r.window.getDecorView(); decor.setVisibility(View.INVISIBLE); ViewManager wm = a.getWindowManager(); WindowManager.LayoutParams l = r.window.getAttributes(); a.mDecor = decor; l.type = WindowManager.LayoutParams.TYPE_BASE_APPLICATION; if (a.mVisibleFromClient) { if (!a.mWindowAdded) { a.mWindowAdded = true ; wm.addView(decor, l); } else { } } }else if (!willBeVisible) { } if (!r.activity.mFinished && willBeVisible && r.activity.mDecor != null && !r.hideForNow) { if (r.activity.mVisibleFromClient) { r.activity.makeVisible(); } } } } void makeVisible () mDecor.setVisibility(View.VISIBLE); }
上面的注释已经写的很清楚了,重点就是一句话:获取Activity的Window中的DecorView并调用WindowManager的addView方法添加DecorView,然后把DecorView设置为可见 。到这里视图的添加已经转移到WindowManager中,阅读过上一篇文章的知道,WindowManager的实现类是WindowManagerImp,WindowManagerImp会把大部分操作转发给WindowManagerGlobal。
1、WindowManagerGlobal :: addView() 所以我们直接看方法WindowManagerGlobal的addView()就行,如下:
1 2 3 4 5 6 7 8 9 10 11 12 13 14 15 16 17 18 19 20 21 22 23 24 25 26 27 28 29 30 31 32 33 34 35 36 public void addView (View view, ViewGroup.LayoutParams params, Display display, Window parentWindow) final WindowManager.LayoutParams wparams = (WindowManager.LayoutParams) params; if (parentWindow != null ) { parentWindow.adjustLayoutParamsForSubWindow(wparams); } else { } ViewRootImpl root; synchronized (mLock) { root = new ViewRootImpl(view.getContext(), display); view.setLayoutParams(wparams); mViews.add(view); mRoots.add(root); mParams.add(wparams); try { root.setView(view, wparams, panelParentView); } catch (RuntimeException e) { } } }
上述方法主要分为4个部分,我们先来看WindowManagerGlobal的addView传进来的4个参数,其中view、params和display三者是必不可少的,view就代表待添加的View,这里是DecorView,params就代表窗口布局参数,diaplay代表的是表示要输出的显示设备,而parentWindow表示父窗口,这里的父窗口并不一定是真正意义上的父窗口,有可能就是描述一个窗口的对象本身。在上述分析Activity的 WindowManager创建时就提到parentWindow就是PhoneWindow本身。
1.1、adjustLayoutParamsForSubWindow(wparams) 接下来我们来看这个方法,这个方法被分为4部分,其中第一部分是注释1,重点是Window的adjustLayoutParamsForSubWindow方法,用来调整params,该方法主要源码如下:
1 2 3 4 5 6 7 8 9 10 11 12 13 14 15 16 17 18 19 20 21 22 void adjustLayoutParamsForSubWindow (WindowManager.LayoutParams wp) if (wp.type >= WindowManager.LayoutParams.FIRST_SUB_WINDOW && wp.type <= WindowManager.LayoutParams.LAST_SUB_WINDOW) { if (wp.token == null ) { View decor = peekDecorView(); if (decor != null ) { wp.token = decor.getWindowToken(); } } } else if (wp.type >= WindowManager.LayoutParams.FIRST_SYSTEM_WINDOW && wp.type <= WindowManager.LayoutParams.LAST_SYSTEM_WINDOW) { } else { if (wp.token == null ) { wp.token = mContainer == null ? mAppToken : mContainer.mAppToken; } }
这个方法主要是为Window的token赋值,如果是应用窗口且wp.token==null,就会给它赋值mAppToken,而这个mAppToken就是我们上面在Activity的attach()方法中传入的mToken,而系统窗口的token为null,原因注释中说了,我们再分析子窗口的token,接上面的decor.getWindowToken(),该方法如下:
1 2 3 4 public IBinder getWindowToken () return mAttachInfo != null ? mAttachInfo.mWindowToken : null ; }
可以看到子窗口的token就是View中mAttachInfo的mWindowToken,那么mAttachInfo是什么?它在哪里被赋值?我们先留一个疑问。
1.2、创建ViewRootImpl 我们回到addView()方法继续看注释2,注释2构建了一个ViewRootimpl,WindowManagerGlobal会为每一个待添加的View创建一个ViewRootImpl,我们看ViewRootImpl的构造方法,如下:
1 2 3 4 5 6 7 8 9 10 11 12 13 14 15 16 17 18 19 20 21 22 23 24 25 26 public ViewRootImpl (Context context, Display display) mContext = context; mWindowSession = WindowManagerGlobal.getWindowSession(); mDisplay = display; mWindow = new W(this ); mAttachInfo = new View.AttachInfo(mWindowSession, mWindow, display, this , mHandler, this , context); } AttachInfo(IWindowSession session, IWindow window, Display display, ViewRootImpl viewRootImpl, Handler handler, Callbacks effectPlayer) { mSession = session; mWindow = window; mWindowToken = window.asBinder(); mDisplay = display; mViewRootImpl = viewRootImpl; }
ViewRootImpl的构造方法中,关键的就是上面三个注释,注释1下面会解释,注释2创建了一个W类对象,它是一个IBinder类型,它在后面会通过Binder IPC传送到WMS中,WMS就是通过这个W类对象和Activity所在进程交互,注释3创建了一个AttachInfo类对象,ViewRootImpl为每一个待添加的View创建一个AttachInfo类对象mAttachInfo,当这个待添加的View与ViewRootImpl建立联系(mView被赋值)后,ViewRootImpl就会调用performTraversal()方法遍历这颗View Hierarchy 把其mAttachInfo赋值给这颗View Hierarchy 中的每一个View的mAttachInfo,所以上面的decor.getWindowToken() 中的mAttachInfo就不为空,这样子窗口的token就是mAttachInfo中的mWindowToken,从AttachInfo构造可以看出,传入的W类通过asBinder转化了一下赋值给mWindowToken,所以现在可以得出结论:子窗口的token就是ViewRootImpl中的W类 。
1.3、 把View、ViewRootimpl、LayoutParams保存到列表 我们回到addView()方法继续看注释3,第三部分就是把待添加的View、新创建ViewRootimpl、待添加的View的LayoutParams分别保存到3个列表,这三个列表在WindowManagerGlobal中,这三个列表的含义如下:
1 2 3 4 5 6 7 public final class WindowManagerGlobal private final ArrayList<View> mViews = new ArrayList<View>(); private final ArrayList<ViewRootImpl> mRoots = new ArrayList<ViewRootImpl>(); private final ArrayList<WindowManager.LayoutParams> mParams = new ArrayList<WindowManager.LayoutParams>(); }
1.4、通过ViewRootImpl 的setView()方法把DecorView显示到窗口上 我们回到addView()方法继续看注释4,注释4就是调用ViewRootImpl的setView方法,它里面会请求View Hierarchy的绘制,并请求WMS显示待添加的View,我们看一下该方法,如下:
1
2
3
4
5
6
7
8
9
10
11
12
13
14
15
16
17
18
19
20
21
22
23
24
25
26
27
28
29
30
31
32
33
34
35
36
37
38
39
40
public void setView (View view, WindowManager.LayoutParams attrs, View panelParentView) synchronized (this ) { if (mView == null ) { mView = view; int res; requestLayout(); try { res = mWindowSession.addToDisplay(mWindow, mSeq, mWindowAttributes, getHostVisibility(), mDisplay.getDisplayId(), mAttachInfo.mContentInsets, mAttachInfo.mStableInsets, mAttachInfo.mOutsets, mInputChannel); } catch (RemoteException e) { } if (res < WindowManagerGlobal.ADD_OKAY) { switch (res) { case WindowManagerGlobal.ADD_BAD_APP_TOKEN: case WindowManagerGlobal.ADD_BAD_SUBWINDOW_TOKEN: throw new WindowManager.BadTokenException( "Unable to add window -- token " + attrs.token + " is not valid; is your activity running?" ); case WindowManagerGlobal.ADD_NOT_APP_TOKEN: throw new WindowManager.BadTokenException( "Unable to add window -- token " + attrs.token + " is not for an application" ); } } } }
在setView方法中,我们先看注释1,在向WMS发起将View显示到手机窗口上前,先调用requestLayout绘制整颗View Hierarchy,这个方法里面会通过Choreographer的postCallback方法注册对应的绘制回调(CALLBACK_TRAVERSAL),等待vsync信号,然后会触发整个View树的绘制操作,也就是performTraversal()方法的执行。我们来看注释2,到这里Activity的Window的添加就交给了mWindowSession,它是一个IWindowSession类型,IWindowSession是一个AIDL接口文件,需要编译后才生成IWindowSession.java接口,mWindowSession是在上面的ViewRootImpl的构造中被赋值的:mWindowSession = WindowManagerGlobal.getWindowSession(); ,关于这部分的已经在上一篇文章讲解过了,所以注释2其实最终调用的Session的addToDisplay()方法,在addToDisplay()中返回了WMS的addWindow()的返回结果,所以从这里开始添加Window的过程转移到WMS进程 中去。
2、WMS :: addWindow() 我们就简单的过一遍WMS的addWindow()方法,如下:
1
2
3
4
5
6
7
8
9
10
11
12
13
14
15
16
17
18
19
20
21
22
23
24
25
26
27
28
29
30
31
32
33
34
35
36
37
38
39
40
41
42
43
44
45
46
47
48
49
50
51
52
53
54
55
56
57
58
59
60
61
62
63
64
65
66
67
68
69
70
71
72
73
74
75
76
77
78
79
80
public int addWindow (Session session, IWindow client, int seq, WindowManager.LayoutParams attrs, int viewVisibility, int displayId, Rect outContentInsets, Rect outStableInsets, Rect outOutsets, InputChannel outInputChannel) int [] appOp = new int [1 ]; int res = mPolicy.checkAddPermission(attrs, appOp); if (res != WindowManagerGlobal.ADD_OKAY) { return res; } final int type = attrs.type; synchronized (mWindowMap) { if (type >= FIRST_SUB_WINDOW && type <= LAST_SUB_WINDOW) { parentWindow = windowForClientLocked(null , attrs.token, false ); if (parentWindow == null ) { return WindowManagerGlobal.ADD_BAD_SUBWINDOW_TOKEN; } if (parentWindow.mAttrs.type >= FIRST_SUB_WINDOW && parentWindow.mAttrs.type <= LAST_SUB_WINDOW) { return WindowManagerGlobal.ADD_BAD_SUBWINDOW_TOKEN; } } AppWindowToken atoken = null ; final boolean hasParent = parentWindow != null ; WindowToken token = displayContent.getWindowToken( hasParent ? parentWindow.mAttrs.token : attrs.token); final int rootType = hasParent ? parentWindow.mAttrs.type : type; if (token == null ) { if (rootType >= FIRST_APPLICATION_WINDOW && rootType <= LAST_APPLICATION_WINDOW) { return WindowManagerGlobal.ADD_BAD_APP_TOKEN; } } else if (rootType >= FIRST_APPLICATION_WINDOW && rootType <= LAST_APPLICATION_WINDOW) { atoken = token.asAppWindowToken(); if (atoken == null ) { return WindowManagerGlobal.ADD_NOT_APP_TOKEN; } else if (atoken.removed) { return WindowManagerGlobal.ADD_APP_EXITING; } } else if (token.asAppWindowToken() != null ) { attrs.token = null ; token = new WindowToken(this , client.asBinder(), type, false , displayContent, session.mCanAddInternalSystemWindow); } final WindowState win = new WindowState(this , session, client, token, parentWindow, appOp[0 ], seq, attrs, viewVisibility, session.mUid, session.mCanAddInternalSystemWindow); res = WindowManagerGlobal.ADD_OKAY; win.attach(); mWindowMap.put(client.asBinder(), win); } }
这个方法很长,但是里面的逻辑还是很有规律,建议对照着注释跟源码看一遍,这里总结一下这个方法的过程:
1、首先如果是系统窗口要进行权限检查,mPolicy是一个PolicyWindowManager类型,如果想知道哪些系统窗口是需要权限的可以查看这个PolicyWindowManager的checkAddPermission()方法,这个方法检查如果不是系统类型的窗口就会返回一个ADD_OKAY表示检查通过,否则表示检查不通过,代表着这个系统窗口没有在Manifest.xml文件中声明权限。
2、如果是子窗口类型,就通过windowForClientLocked()方法还要检查其父窗口是否存在,子窗口一定要有父窗口。
3、根据类型type检查token是否有效,应用窗口和子窗口的token是一定要赋值的,否则创建窗口会抛异常,且应用窗口中的token必须是某个有效的 Activity 的 mToken。而子窗口中的token必须是父窗口的 ViewRootImpl 中的 W 对象。对于部分系统窗口其token也要赋值,有些系统窗口的token不需要赋值。这个token赋值规则可以对照上面的adjustLayoutParamsForSubWindow(wparams)的方法解说。
4、通过WindowState的attach方法,WMS把渲染Window视图的任务交给了SurfaceFlinger。
5、一系列的检查后,WMS会为每一个Window会创建一个WindowState,并以传过来的W类为Key,新创建的WindowState为Value建立映射存放进WindowHashMap中,这个WindowState维护着窗口的状态以及根据适当的机制来调整窗口的状态。
这个添加过程如下图:
总结 以上就是Activity的Window的添加过程,我们发现添加一个Window最重要的是View、type和token,至于其他类型窗口的添加相似的,一图总结本文,如下:
从图中可以看到,添加一个Window,会涉及到两个进程的交互,一个是Activity所在的应用进程,一个是WMS所在的系统服务进程,所以绿色的那部分就代表着IPC,ViewRootImpl通过WindonManagerGlobal的静态变量sWindowSession负责与WMS通信,它是Session类型,在ViewRootImpl构造中被赋值,WMS中的每个Window的WindowState的mClient负责与Activity所在的应用进程通信,它是W类型,在创建WindowState构造中被赋值,在Activity所在的应用进程的WindonManagerGlobal中会为每一个添加的Window中的View创建一个ViewRootImpl,所以多个Window就对应多个ViewRootImpl,而在WMS中,Window对应着一个View,它会为每一个Window创建一个WindowState以维护Window的状态,所以多个Window就多个WindowState。
从应用窗口的添加过程中,对Window的机制也有了一些了解,以后如果遇到有关于Window的添加的异常也懂得去哪里找原因。
参考资料:
Android Window 机制探索
浅析 Android 的窗口


